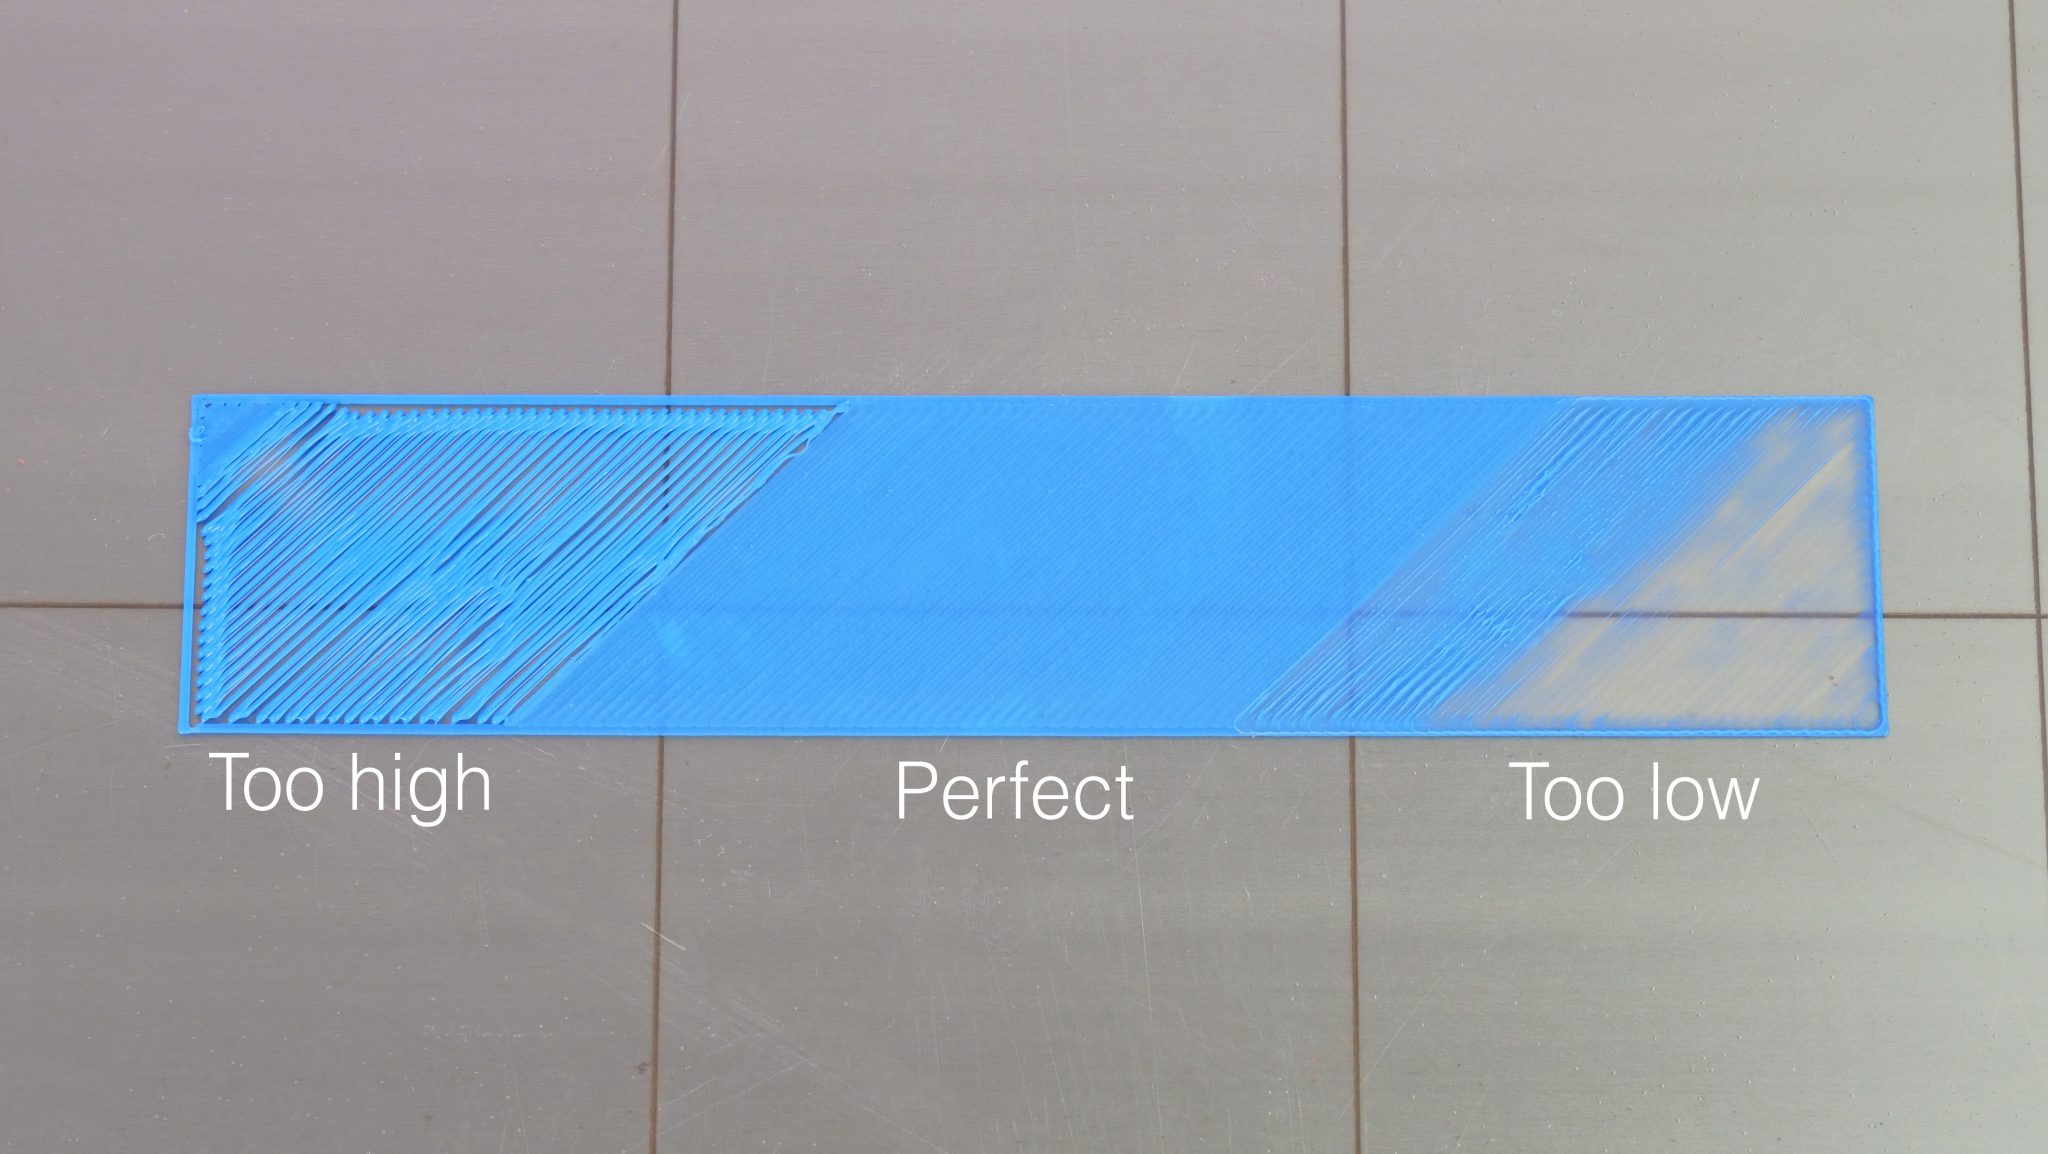
Achieving a flawless first layer is crucial for successful 3D prints. The Z offset plays a significant role in determining how your printer’s nozzle interacts with the bed during printing. Here’s a step-by-step guide on setting the perfect Z offset, including bed leveling, first layer tests, and calibration prints.
Step 1: Leveling the Bed
Before adjusting the Z offset, ensure the bed is leveled. This process ensures that the print surface is uniformly distanced from the nozzle across its entire print area.
Methods for Leveling the Bed:
- Manual Leveling: Most 3D printers come with manual leveling knobs located underneath the print bed. Use a sheet of paper as a spacer and move the nozzle to each corner of the bed. Slide the paper between the nozzle and the bed; you should feel slight resistance without tearing the paper.
- Automatic Bed Leveling (ABL) Sensors: If your printer is equipped with an ABL sensor, such as a BLTouch, the printer will automatically probe the bed to determine height discrepancies. You may still need to fine-tune the Z offset.
Step 2: Setting the Z Offset
The Z offset is the distance between the printer’s nozzle and the print surface when it starts the first layer. This fine-tuning determines how close the nozzle gets to the bed.

Steps to Set Z Offset:
- Access Z Offset Settings: Navigate to your printer’s control panel and look for the Z offset settings. Some printers allow you to manually adjust it during a print, while others require you to preset it before starting.
- Home the Printer: Home your printer’s axes so the nozzle moves to its default position. This ensures the Z offset is being measured from the correct starting point.
- Adjust the Z Offset: Begin by printing the first layer of a calibration print (more on this later). As the print starts, adjust the Z offset using your printer’s control panel. You want the filament to be pressed lightly onto the bed without being squished too much or too little. The goal is to find a balance where the filament adheres well but isn’t too flat or uneven.
Step 3: Running First Layer Tests
Once the Z offset is set, it’s time to test the first layer to ensure proper adhesion and alignment. You can download first-layer test patterns from popular 3D printing websites like Thingiverse. Links to my preferred first layer tests can be found at the end of this article.
What to Look For:
- Too Close: If the nozzle is too close, the filament will appear thin, and you may hear grinding noises from the extruder. The first layer might look squished, with edges curling upwards.

- Too Far: If the nozzle is too far, the filament won’t stick properly to the bed, causing a stringy, uneven first layer.

- Just Right: A perfectly set Z offset results in a smooth, even layer where the filament adheres well to the surface without excessive squishing.

If needed, fine-tune the Z offset further to perfect the first layer as seen in the photo above.
Step 4: Calibration Prints
After setting the Z offset, it’s a good idea to run a few calibration prints to ensure overall print quality.
Recommended Calibration Prints:
- Bed Leveling Test Patterns: Print a grid that covers the entire print bed to check for inconsistencies in leveling.
- XYZ Calibration Cube: This small cube allows you to measure the accuracy of the dimensions in all three axes (X, Y, and Z) and catch any alignment issues.
- First Layer Calibration Print: This specific test print allows you to confirm that the Z offset is set properly and that the entire first layer is printed uniformly across the bed.
Conclusion
Setting the Z offset correctly is a critical part of ensuring successful 3D prints. With a leveled bed, well-adjusted Z offset, and thorough testing through calibration prints, you’ll enjoy better adhesion, improved first layers, and higher-quality prints overall.

